Idle Mixture Adjustment
- Bring the engine to operating temperature.
- Adjust the idle to manufactures specifications.
- Having the idle up too high will bypass the idle circuit and adjusting the idle mixture will have not affect.
- Hook up a vacuum gauge to a port that has steady vacuum.
- Turn both screws out 1/2 turn – Turn the idle mixture screw out 1 1/2 turns while on the bench.
- Turn each screw in, alternating between them, 1/4 turn at a time until you get a steady vacuum reading.
Another way:
- Bring the engine to operation temperature.
- Adjust the idle to manufactures specifications.
- Turn both idle mixture screws out 1/2 turn.
- Alternating between the screw turn in 1/4 turn at a time. Give the engine a second to catch up.
- When the rpm starts to drop, turn the screw back 1/4 turn and leave it there.

Idle Speed and Mixture 1 1/4″ BBD
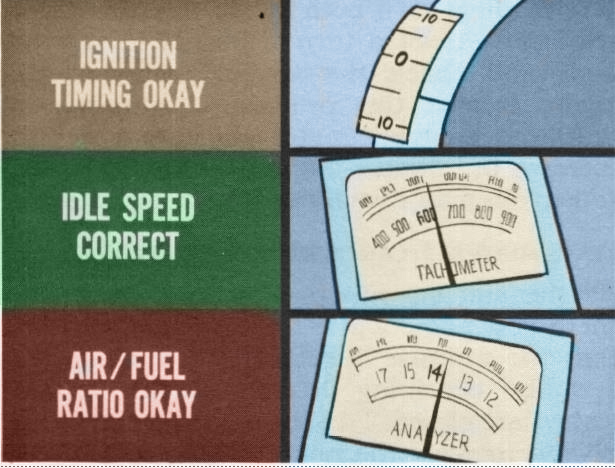
Idle mixture and idle-speed adjustment go hand in hand. The objective is to arrive at the correct idle speed, correct air/fuel ratio, acceptable idle quality and correct balance between the two idle systems of the dual-barrel carburetor. Your best bet is to follow the Service Manual procedure to the letter. There is no point in repeating those instructions word for word, however, a review of the idle speed and idle-mixture adjusting recommendations will help explain why certain steps and precautions are very important.
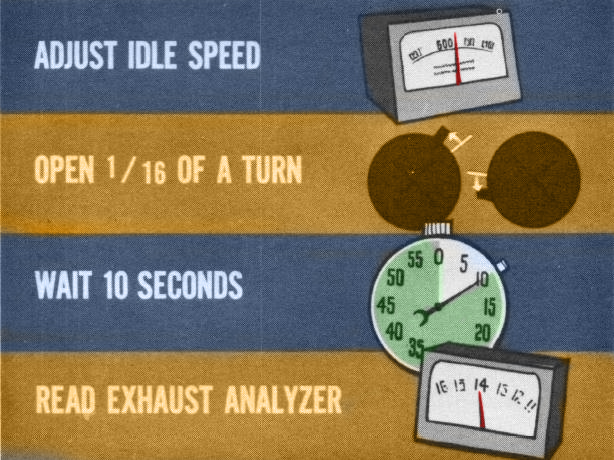
To begin with, the engine must be properly warmed up, the ignition timing must be correct … if you’re not sure, check it before you fool with the carburetor. You must use an accurate tachometer to arrive at correct idle speed and an exhaust analyzer to obtain the correct air /fuel ratio. The first step is to make sure the exhaust analyzer is indicating correctly. To accomplish this, open each idlespeed screw an additional 1/16 of a turn. Wait ten seconds to make sure the analyzer is registering the resulting change in the air/fuel ratio and then read the analyzer meter. The reading should be numerically lower than it was, indicating that this initial adjustment did increase the richness of the mixture. If 1/16 of a turn doesn’t produce a richer mixture reading, turn both of the mixture screws another 1/16 of a turn richer. Wait ten seconds and check the air/fuel ratio reading again. Repeat this procedure, as necessary, until the analyzer meter registers a definite increase in richness. Perhaps it would be well to explain why this initial step is important.
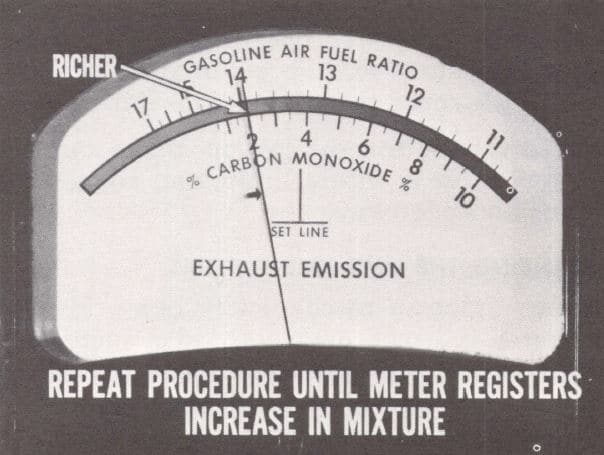
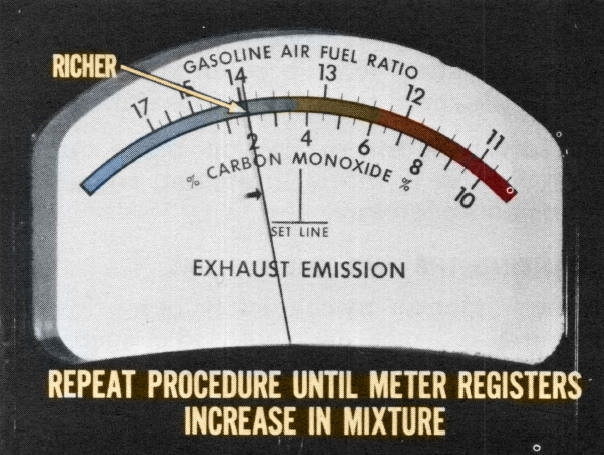
As the air/fuel mixture becomes very lean, there is a point where the analyzer indicates that the mixture is getting richer when it is actually becoming leaner as the mixture screws are closed. To eliminate this possibility, always increase the richness 1/16 of a turn at a time until the meter moves in the richer direction and the mixture is on the too-rich side rather than the too-lean side. Make your final adjustment by going from rich to lean.
Once the too-rich condition has been established, lean out the mixture by adjusting both mixture screws 1/16 of a turn at a time until you bring the air/fuel ratio within specifications. The important things to remember are: adjust both screws the same amount each time; don’t adjust more than 1/16 turn at a time; and wait ten seconds after each adjustment before you check the meter reading. The acceptable air/fuel ratio rartge is from 14.0 to 14.4. Actually, 14.2 is the preferred ratio for most of our engines.
You must keep one eye on the tachometer when adjusting idle speed mixture and readjust idle speed to specifications if it changes.
Before you button the job up, make sure the air/fuel ratio is within limits and engine idle performance is okay.
If the engine is mechanically okay, ignition timing is correct and both idle speed and air /fuel ratio are within specifications, engine idle operation will usually be satisfactory. However, if engine idle cannot be smoothed out within the range permitted by the idle screw limiting tabs, you may have to balance the two idle systems.
If the two idle systems are out of balance you must remove the plastic caps from the mixture screws so that you can turn them in a clockwise direction until they are fully seated. Next, open both screws 1 ½ turns to establish a starting point. From there on follow the same idle mixture and speed adjusting procedure outlined previously … just as you would if the plastic caps were in place.
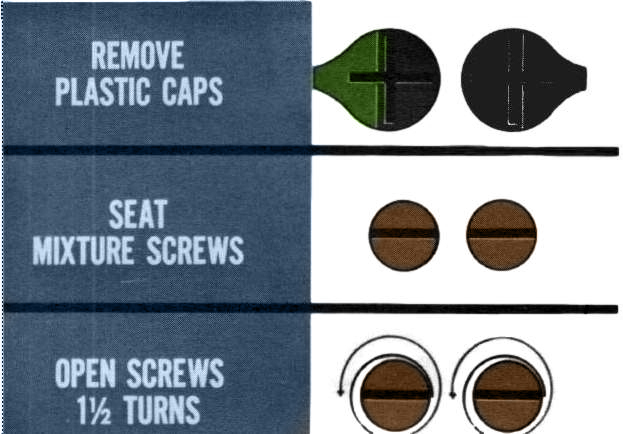
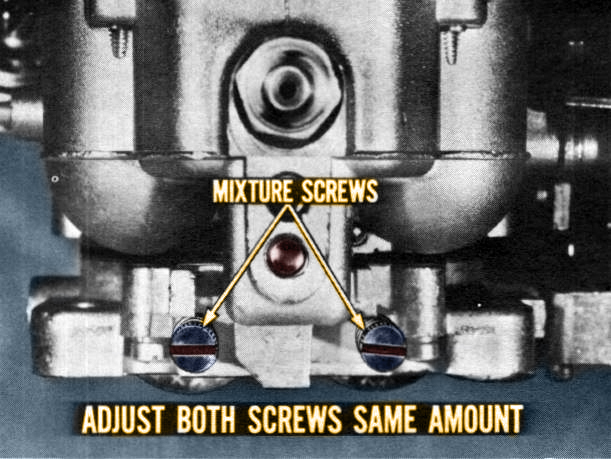
Just be very careful to always turn each screw exactly the same amount on each adjustment so that you maintain the balance between the two idle systems. After correct balance and air /fuel ratio are obtained, re-install the plastic limiting tabs in their mid-position … halfway between their stops.
After prolonged idling the entire engine is apt to get hotter than normal. If this happens when you are adjusting the idle mixture, you’ll wind up with an air/fuel ratio that is too

lean. Here’s how that comes about. If the carburetor gets abnormally hot, the fuel tends to boil and push an abnormal amount of fuel vapor out of the carburetor and into the intake manifold … along with the regular idle mixture. The exhaust analyzer will show that the engine is being supplied the right air /fuel ratio. Then, when the carburetor cools down to normal operating temperature and stops supplying this extra fuel vapor, the mixture will actually be too lean.
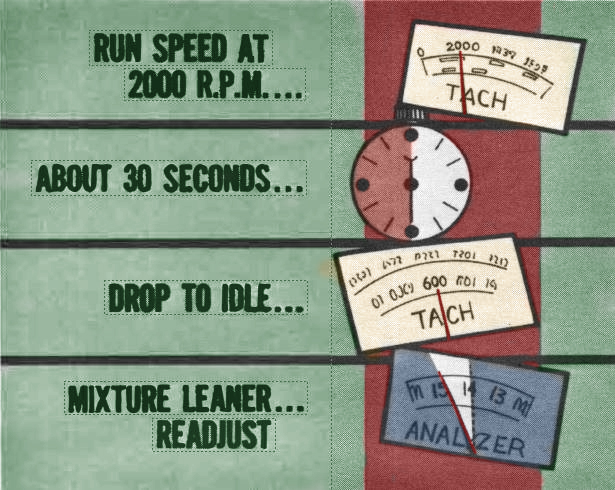
To spot this condition when tuning an engine, remove the exhaust analyzer probe from the tail pipe so the analyzer won’t be damaged. Run the engine at about 2,000 r.p.m. for about 30 seconds to get rid of some of the excess heat and vapor pressure in the carburetor. Then, let the engine speed drop back to idle. If the analyzer meter now shows that the mixture is leaner than it was, you better readjust it.
This too-lean mixture condition from an abnormally hot engine is most apt to happen in very hot weather or where air circulation in the service bay is restricted. The important thing is to recognize the condition and understand the problem so that you don’t turn out tune-up jobs with carburetors that are too lean for decent idle performance.
Idle Speed and Mixture – 1 1/2″ BBD
The idle mixture setup on the 1 ½” BBD is a little different. There is a single mixture screw and the two idle mixture limiter screws are
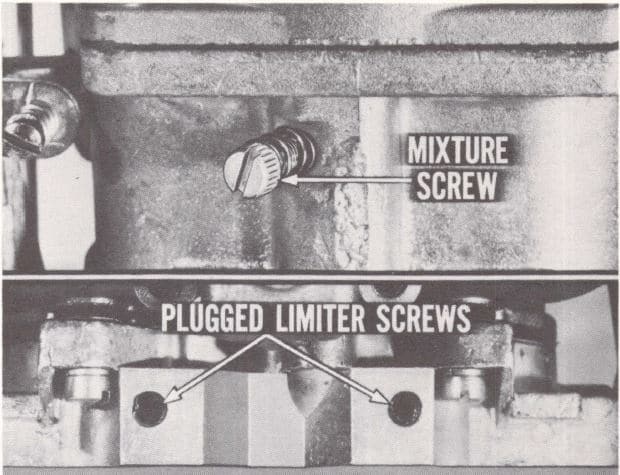
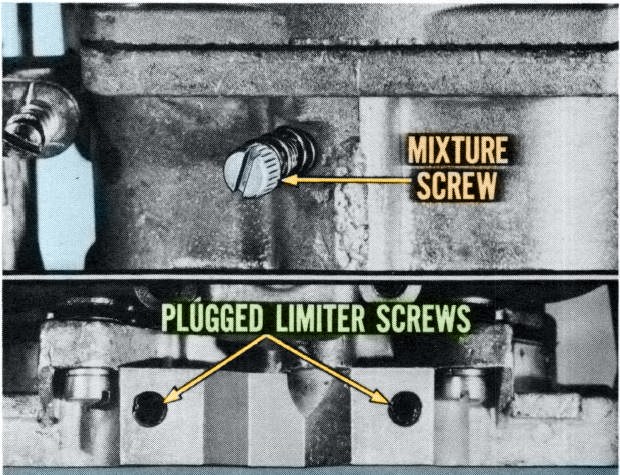
plugged and not normally adjusted in service.
The single mixture screw is actually an air adjustment screw rather than a mixture screw.
It has a left-hand thread so that turning this screw clockwise actually backs the screw out,
adds more air to the mixture and leans the mixture out. Turning the screw counterclock
wise, reduces air flow to the idle system, increasing the richness of the idle mixture.
All of the general precautions and instructions for adjusting the 1¼” BBD apply to adjust
ing idle mixture on the 1½” BBD. The engine must be warmed up, specified idle speed must
be maintained, an exhaust analyzer must be used to determine the correct air/fuel ratio, final mixture adjustment should be made from rich to lean and mixture adjustment should be made 1/16 of a turn at a time. The single mixture screw simplifies the air/fuel ratio adjustment. However, if idle is objectionably rough, or you can’t get rid of a low speed surge, you may have to unplug the limiter screws and readjust them to obtain correct balance between the two idle systems.
If limiter screw adjustment is required, you start by establishing mixture screw position. To accomplish this, you turn the mixture screw counterclockwise until it is fully seated, then turn it clockwise ¾ of a turn to open it.
The next step is to unplug the limiter screws and adjust them. Turn both of the limiter screws clockwise to seat them and then open them 1 ½ turns. These initial adjustments of the single mixture screw and the two limiter screws establish a basically balanced condition between the two idle systems and provide a starting point for final mixture adjustment.
The final adjustment of the limiter screws is accomplished in exactly the same way as the adjustment of the mixture screws for the 1¼” BBD. In other words, you adjust both limiter screws 1/16 of a turn at a time to obtain an air/fuel ratio and engine idle speed that is within specifications. Be sure and adjust each limiter screw exactly the same amount each time so that you maintain the correct balance between the two idle systems. Once balance is established and you are within specifications, use the single mixture screw to obtain smooth engine idle and precise air /fuel ratio.
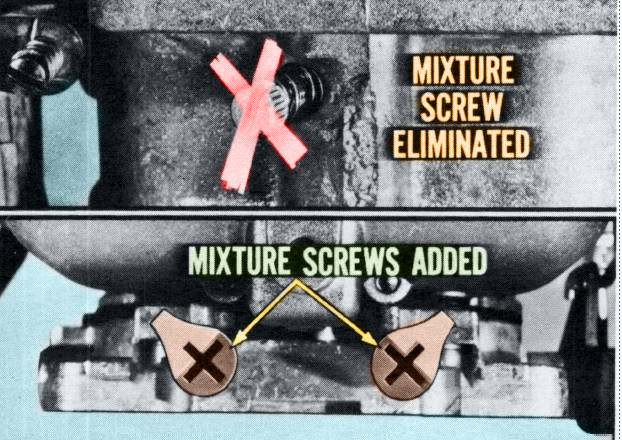
Some changes are being made in the 1 ½” BBD carburetors. Before the end of the model year you’ll probably see some of the 1½” BBD’s with the single mixture screw eliminated and the two limiter screws replaced by two new idle mixture screws. These new mixture screws will have plastic limiting tabs, just like the ones on the current 1¼” BBD’s. As a matter of fact, when these new carburetors arrive on the scene, just follow the Service Manual instructions for 1 ¼” BBD idle speed and mixture adjustment.